1 定义
Flume是一种高效收集、聚合和移动海量日志数据的分布式、可靠、可用的服务。
它具有简洁、灵活的基于流式数据流的架构。因为可调可用性机制、许多故障转移和恢复机制,具有健壮和容错的特性。使用的简单可扩展数据模型,可用于在线分析应用。
版本1.9.0特性
后向支持1.x版本
更好的SSL/TLS支持
用于插入敏感数据到配置中的配置过滤器
上下文中的单、双精度数据支持
kafka客户端升级至2.0
支持HBase 2
2 Flume NG快速入门
(1) 版本定义
NG的目标在于比OG更加简洁、精炼和易用,不保证与OG的后向兼容性。
Flume OG - 0.x
Flume NG - 1.x
(2)版本变化
相比OG,原始概念大体相同,但是仍存在以下差别:
- sources和sinks功能不变,但是通过channels连接。
- channels是可插拔和决定持久性的(dictate durability)。NG引入了基于内存的快速但不持久的事件传递和基于文件的持久事件传递。
- 不再有逻辑或物理节点之分。所有的物理节点被称之为agents,可以运行0或多个sources和sinks。
- 不再有主节点和ZooKeeper依赖。Flume运行在一个简单的基于文件的配置系统。
- 几乎一切都是插件,有的面向用户,有的面向工具和开发者。可插拔的组件包括:sources, sinks, interceptors, sink processors, and event serializers。
(3) 源码编译
1) 前提
JDK 1.6
Maven 3.x
本地磁盘~90MB
网络连接
2) 下载源码
1 | git clone https://git-wip-us.apache.org/repos/asf/flume.git flume |
3) 编译源码
编译源码需要超出默认配置的内存资源
1 | export MAVEN_OPTS="-Xms512m -Xmx1024m -XX:PermSize=256m -XX:MaxPermSize=512m" |
编译命令
1 | Build the code and run the tests (note: use mvn install, not mvn package, since we deploy Jenkins SNAPSHOT jars daily, and Flume is a multi-module project) |
其中,在flume-ng-dist/target目录下,-bin文件表示二进制发布包,-src表示只有源码
4) 解压并配置
从模板拷贝配置文件
1 | cp conf/flume-conf.properties.template conf/flume.conf |
5) 环境配置(可选)
对于调试分析,可以配置flume-env.sh文件,指定运行时的sources或sinks。命令中使用–conf或-c指定
6) 运行flume
使用命令bin/flume-ng
(4) 配置
1) Flume通过Java属性文件配置,通过-f参数指定。推荐放置在conf目录中。
以下为配置示例:
1 | Define a memory channel called ch1 on agent1 |
注意:
- 定义应在声明前。
- 激活后才能使用。
- 多个组件使用空格分隔。
- 细节见
org.apache.flume.conf.properties.PropertiesFileConfigurationProvider
理解:组件名称在属性名称中体现
- 定义agent名称、channel名称和类型
- 定义source名称并连接到channel,指定类型,绑定IP和端口
- 定义sink名称和类型,并连接到channel
- 激活channel、source和sink
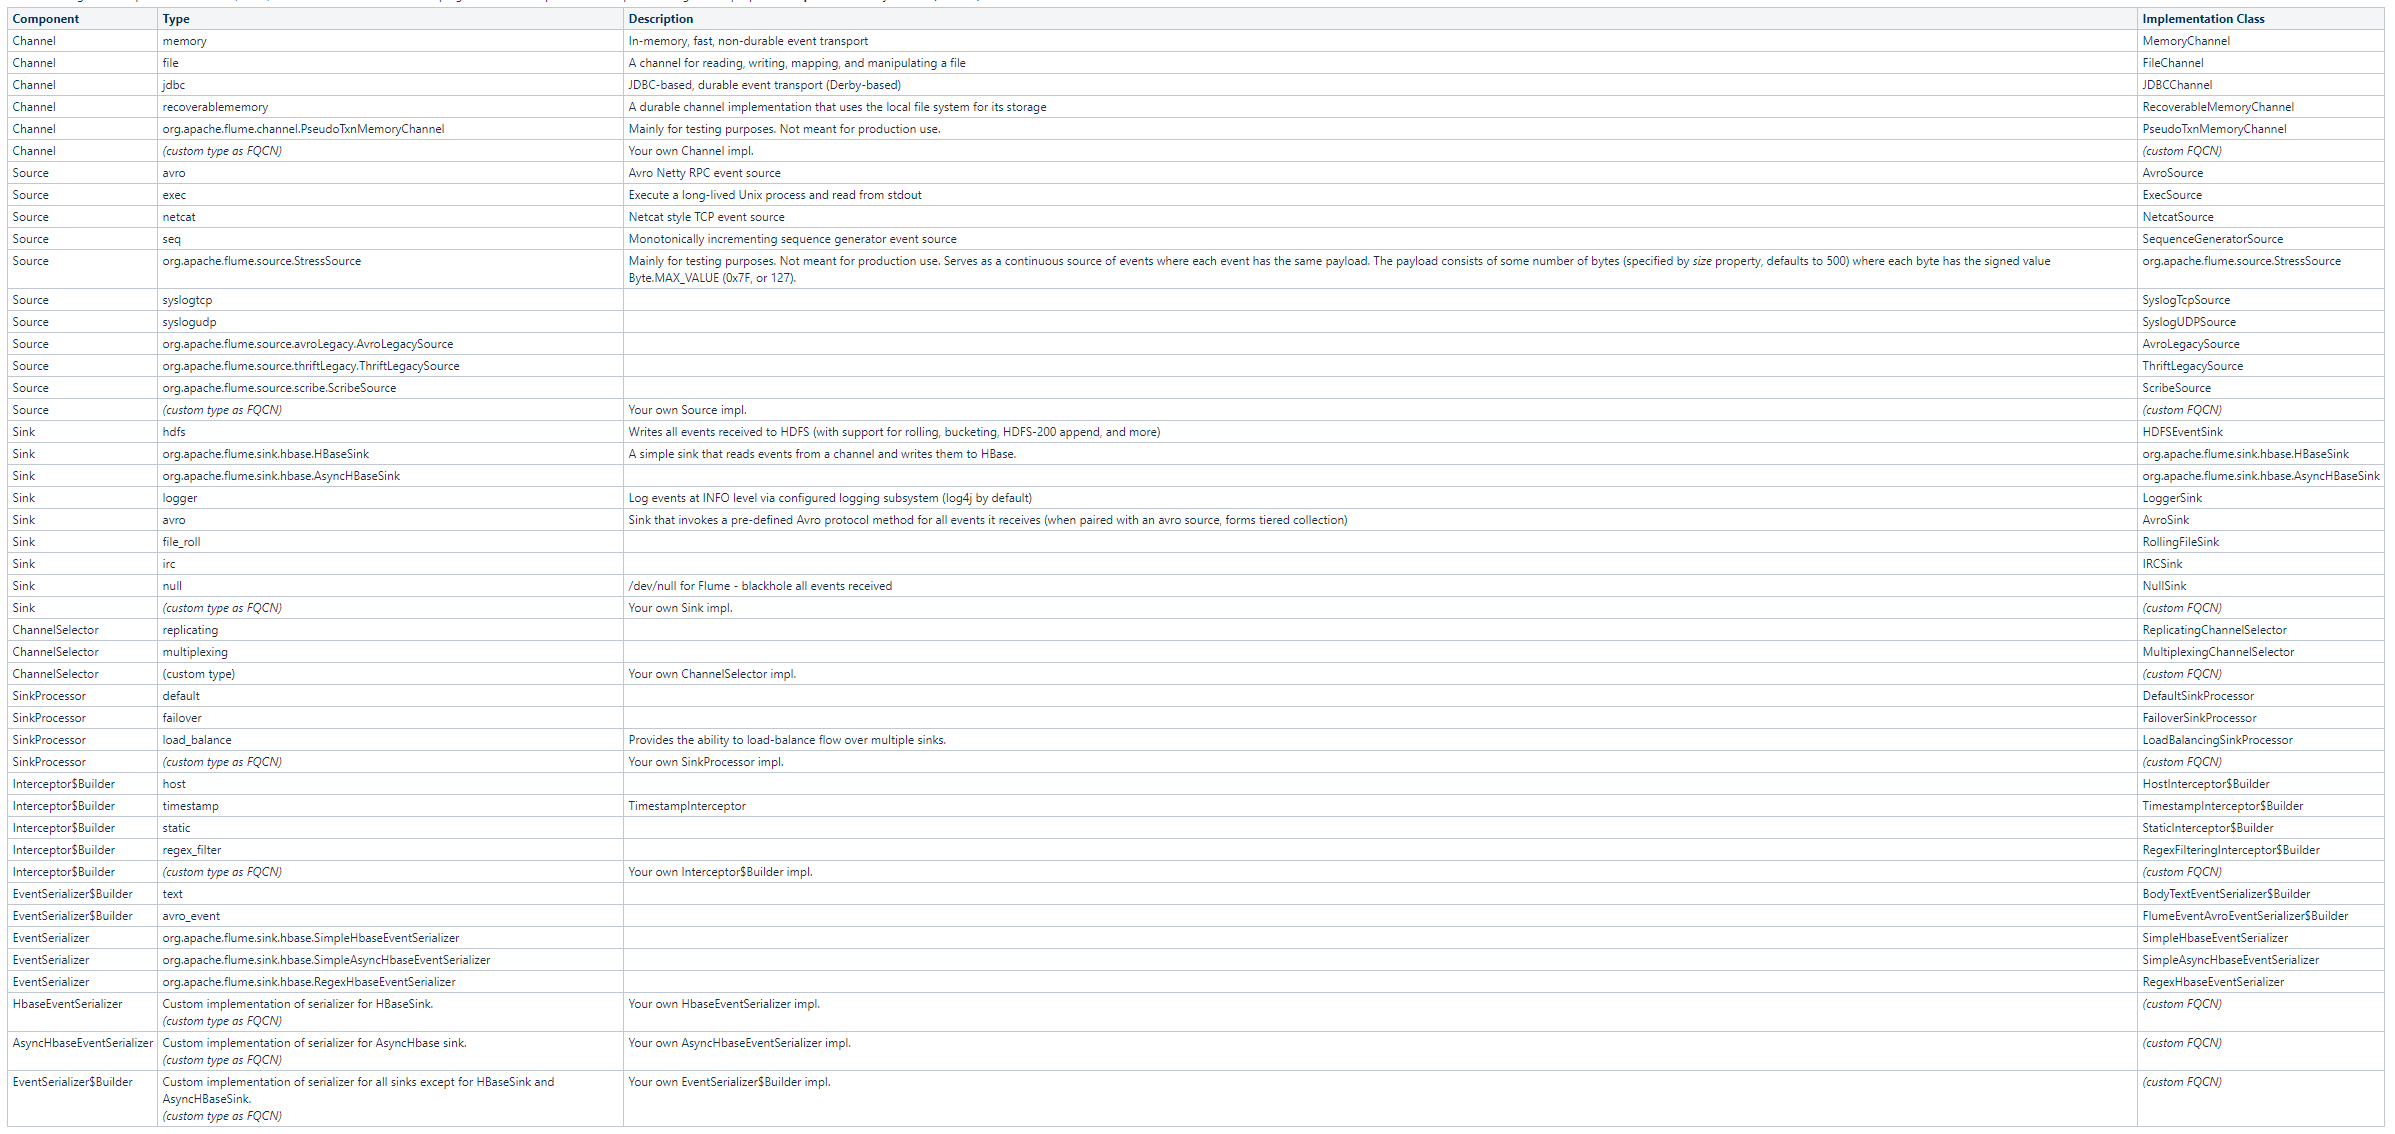
以下为常见的组件:
2) 启动flume
1 | bin/flume-ng agent --conf ./conf/ -f conf/flume.conf -Dflume.root.logger=DEBUG,console -n agent1 |
注意:命令中指定的agent名称必须与配置文件中的一致
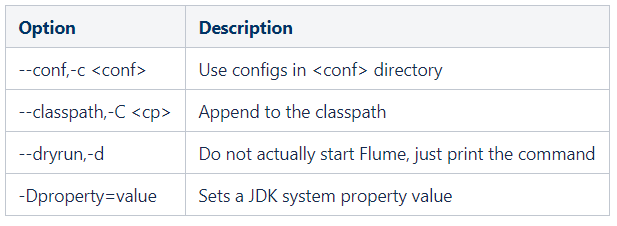
flume-ng全局选项
agent选项:
agent启动时必须指定配置文件

avro-client选项;
avro-client从标准输入发送文件或数据到指定的主机端口。
将每一行视为一个事件。
如:

注意:Flume1.9.0测试到的Kafka版本为2.0.1,并且需要选择合适的Scala版本。
Testing was done up to 2.0.1 that was the highest avilable version at the time of the release.